
You are here -> IP Camera V2.1
| Click the DOWNLOAD button to download IPCamMonitorV2.1 (V2.1 - 170kb) |  |
SabreTech Associates IPCamControl V2.1
Introduction
The internal camera movement detection is limited by the camera hardware and is prone to spurious triggers. I therefore decided to add a detection and tracking algorythm to IPCamControl.
My initial idea was to use a library for the movement detection. There are a number of image processing libraries available and I tested most of them. Whilst I had no major problems getting them to work, the processor loading was rather too high for my liking (35% - 40% on a AMD Phenom II X4 965). After much consideration I decided to code the detection routines in Java myself to see what could be done. The result of my efforts was a detection and tracking algorythm that works reasonably well whilst only consuming 3%-4% of the processor. I consider this to be acceptable.
My camera looks at my driveway and included in the view are areas that I do not wish to monitor. There is also the problem of the trees causing spurious event triggers when the wind blows. To resolve these issues, I implemented a mask. The mask is used to 'block' areas of the view from the detection algorythm.
I also implemented some other changes and improvements which are detailed below.
I would appreciate some feedback (good or bad) if you try the application. Please send me an email at
Installation
The application is programmed in Java and requires Java V1.6 or newer to be installed on the computer it is being run on.
Java can be installed from:
http://www.java.com/en/download/index.jsp
No installation is required. Simply copy the ‘IPCamMonitorV2-0b.jar’ file to a convenient folder on your computer to which you have write access.
On first execution the Create Configuration dialog will be displayed.

Enter the IP address of the IP Address and Port number of the camera you wish to view.
Enter an administrative Username and Password that matches a valid camera Administrator.
Click Save to write the configuration and proceed to the application.
Click Exit to cancel the setup and exit.
Subsequent running of the application will not perform this step. To change the settings in the future, delete the ‘IPCam.config’ file in the installation directory or start the application with the camera power off.
Main IPCam window

The main portion of the window shows the image from the camera.
The icons on the left are:
![]() Record: Starts a video recording. The icon changes to
Record: Starts a video recording. The icon changes to ![]() whenever a recording is in progress. Clicking
whenever a recording is in progress. Clicking ![]() will stop any current recording. The recording period is set in the Record Setting dialog.
will stop any current recording. The recording period is set in the Record Setting dialog.
![]() Snapshot: Takes a snapshot of the current picture. A camera shutter sound will be heard if sound is not disabled.
Snapshot: Takes a snapshot of the current picture. A camera shutter sound will be heard if sound is not disabled.
![]() Sound ON: Clicking the icon will disable all sound and change the icon to
Sound ON: Clicking the icon will disable all sound and change the icon to ![]() . Clicking the
. Clicking the ![]() icon will turn sound back ON.
icon will turn sound back ON.
![]() Settings: Clicking the icon will display the Settings dialog.
Settings: Clicking the icon will display the Settings dialog.
![]() About: Clicking the icon will display information about the application and a link to the Sabretech online help.
About: Clicking the icon will display information about the application and a link to the Sabretech online help.
If Enable Window Sizing is selected (see IPCamControl Settings) the window can be resized by dragging the window edges.
Pressing the SHIFT key will cause the aspect ratio of the window to be modified to match the picture from the camera. Hold the SHIFT key down whilst dragging a corner of the window.
IPCamControl Settings
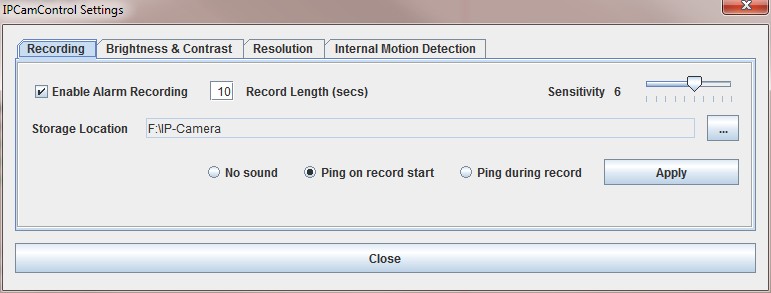
Recording
The Enable Alarm Recording checkbox enables and disables the automatic video recording. Checked is enabled, unchecked is disabled.
Record Length is the number of seconds that all recordings will run for, both manually selected using the Record icon and automatically triggered on motion detection. Enter a number in seconds that a recording should run for.
Sensitivity controls the sensitivity of the motion detection in the camera. Use the slider to adjust between 1 (Minimum sensitivity) to 10 (Maximum sensitivity). The sensitivity selection is used for both camera and internal motion detection.
The Storage Location is used to store both video recording and snapshots. It defaults to the same folder that contains the application.
Clicking the browse button ![]() displays a file dialog so that an alternative storage folder can be selected.
displays a file dialog so that an alternative storage folder can be selected.
A folder structure within the Storage Location is created when a recording is made. A folder for the current month will be created in the format YYYY-MM, within which a daily folder will be created in the format YYYY-MM-DD. The recording filename takes the format IPCam-YYYY-MM-DD_HH-MM-SS.avi
The No sound, Ping on record start and Ping during record control the alarm sound made during manual and automatic recording.
Select Apply to save the settings. Select Close or close the IPCamControl Settings dialog to ignore any changes made.
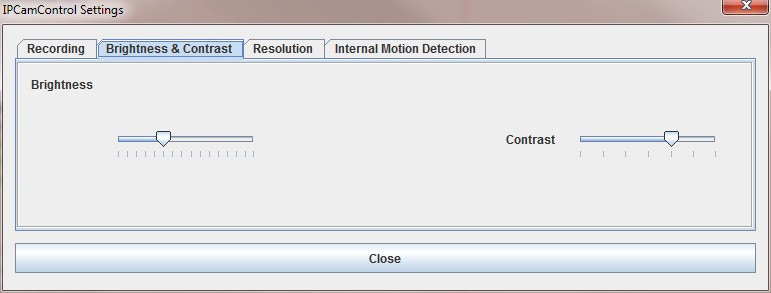
Brightness & Contrast
The video controls are dynamic and update the main window picture as changes are made.
Brightness: Move the slider to the left to decrease the brightness. Move right to increase the brightness.
Contrast: Move the slider to the left to decrease the contrast. Move right to increase the contrast.
Note: It can take several seconds to update the display to match the new selection.
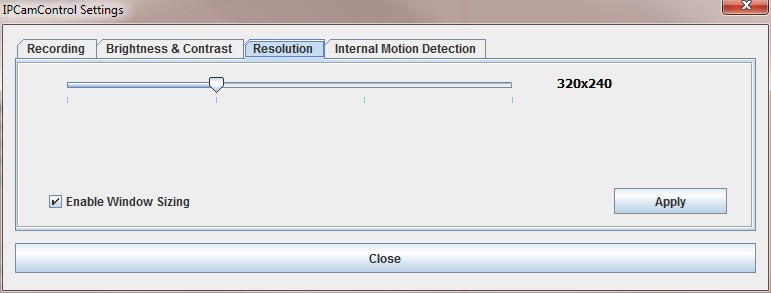
Resolution
Enable Window Sizing: Select the checkbox to allow the main window to be resized using the mouse. Deselect to inhibit manual window sizing.
Resolution: The slider has four positions which select resolutions of 160 x 120, 320 x 240, 480 x 360 and 640 x 480 respectively.
Select the Apply button to activate the new Enable Window Sizing and Resolution setting. This will result in the application being re-initialised. To discard the changed select the Close button or close the IPCamControl Settings dialog.
Note 1: If Enable Window Sizing is not selected then the main window Maximise button is disabled and the window size if fixed to match the picture from the camera.
Note 2: The 160 x 120 and 480 x 360 modes are undocumented and are not available from the manufacturers software. They appear to work with my camera but YMMV.
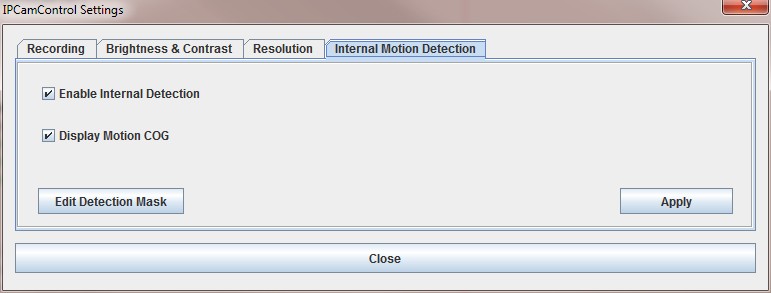
Internal Motion Detection
Select Enable Internal Detection to use the internal detection algorithm. Deselect to use the camera detection.
Select Display Motion COG to display movement tracker ‘centre of gravity’. This is only available when Internal Detection is enabled. When selected the COG is displayed as a RED circle over the centre of the area of movement. The COG is not recorded.
Select Apply to save the settings. Select Close or close the IPCamControl Settings dialog to ignore any changes made.
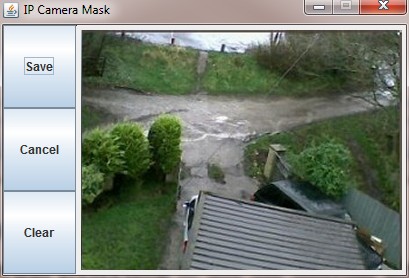
Edit Detection Mask
Selecting Edit Detection Mask displays the mask editor window, closes the settings dialog and discards changes that have not been applied. An image snap is taken of the current camera view and overlaid with any existing mask. In the example above no mask has yet been created.
The mask can be used to prevent movement being detected in areas in which you are not interested.
Using the example shown, I have no interest in recording events happening in the car park at the top of the image. The trees also cause problems when the wind is blowing as the movement is often sufficient to trigger spurious recordings, as do the bushes at the lower left.
The mask is created from polygons. A polygon is created by clicking the left mouse button on the image to create a start point. The area to be masked can then be defined by clicking the left mouse button at each position around the area. A line will be drawn between each point as the polygon is created. Clicking the right mouse button automatically draws a line between the last point and the first point to complete the polygon. It is then filled in black to show the mask polygon that has been created. This process can be repeated to create multiple polygon regions.
Polygons can overlay other polygons.
To make it easier to get to the edge of the image the mouse can be clicked in the surrounding white border. The position will then be constrained to the nearest point on the image.
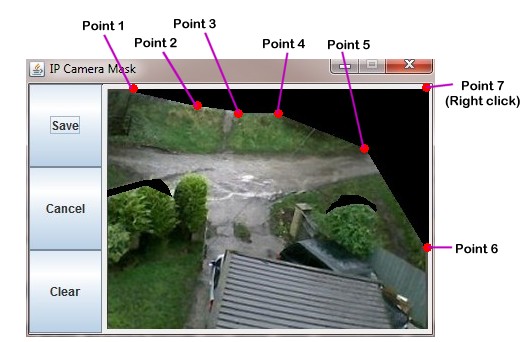
This is the mask I created for my camera. There are three polygons, one for the car park and trees and one each for the two areas that create spurious triggers when the wind blows. The mouse clicks for the creation of the first polygon are detailed in the above image.
Select Save to store the polygon list into the same location as the configuration file and close the Mask Editor dialog.
Select Cancel to close the Mask Editor dialog and retain any current mask.
Select Clear to remove the current mask.
Closing the Mask Editor dialog will also discard any changes made and retain the current mask.
SabreTech Associates Ltd. Lanview, Bunker Street. Freckleton. Lancashire PR4 1HA